The most useful feature in Microsoft word toward sharing the editing is Track Changes. It makes each edits a visible comment, each one is marked by a name and date and a conversation thread of comments. This guide goes deeper than a how-to — it explains why Track Changes matters, shows real workflows, compares related tools, provides practical tables (shortcuts, platform differences, troubleshooting), and gives ready-to-paste text and checklists you can drop into a real project.
Table of Contents
What is Track Changes?
Track Changes is a functionality in Word that tracks the changes (additions, deletions, format changes, moved text, etc.) and assign them to the name and date of the editor. It displays edits in the form of color markups in the document and allows reviewers to comment. An individual (the owner or any other reviewer who is given authority to do so) can then either accept or reject every change. https://support.microsoft.com/en-us/office/track-changes-in-word
Why it can be helpful: to retain an editable record, selectively see changes, and hold yourself accountable: which is very important in teams, in legal work, in academic papers, or any context where it is vital to see who made which edits.
Quick comparison — Track Changes vs related features
| Feature | What it does | Best when… | Limitation |
| Track Changes (Word) | Records detailed edits with reviewer name and time; shows markup in-line or in balloons | Multiple reviewers editing the same file but you want to review/approve later | File becomes visually busy; reviewers must manage markup |
| Compare / Combine (Word) | Compares two documents and shows differences; can merge revisions from multiple copies | You have separate edited copies and want a single integrated file | Comparison is one-time; not a live collaborative mode |
| Suggesting mode (Google Docs) | Like Track Changes, records suggested edits in the cloud; reviewer must accept/reject | Real-time collaboration across locations and devices | Requires Google account; different UX than Word |
| Version History | Shows saved document versions (snapshots) | You want to restore entire earlier version rather than granular edits | Less granular than Track Changes for individual edits |
How Track Changes works — the essentials
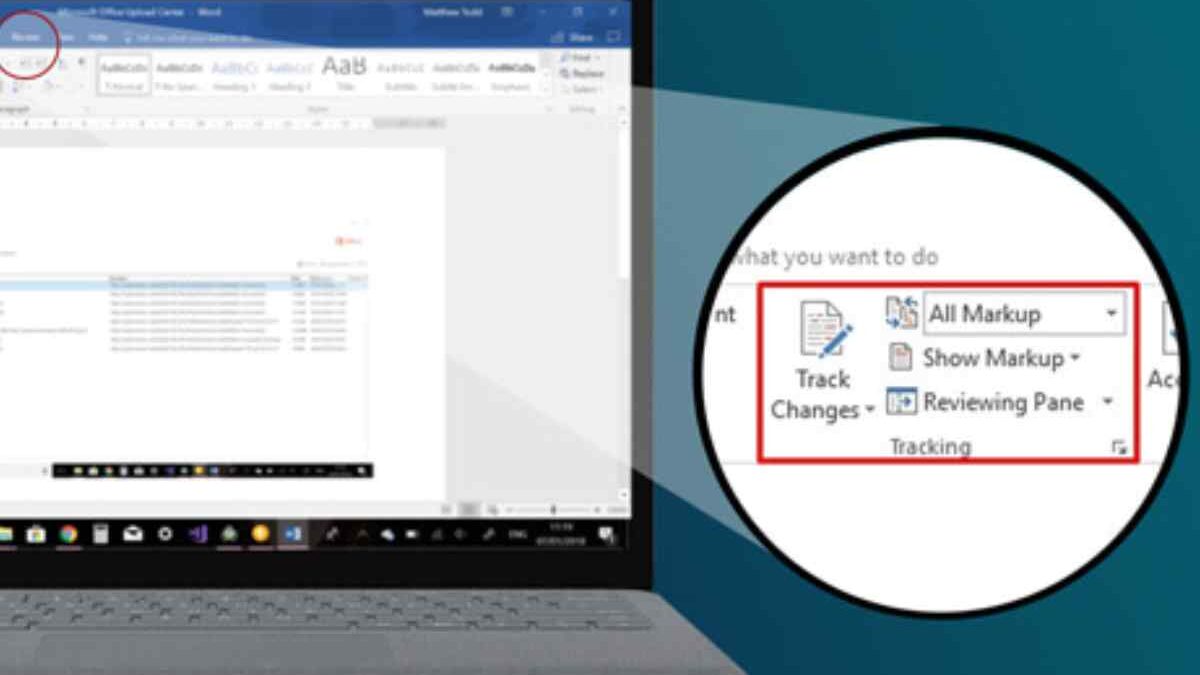
- Turn it on (Review → Track Changes, or Ctrl/Cmd + Shift + E).
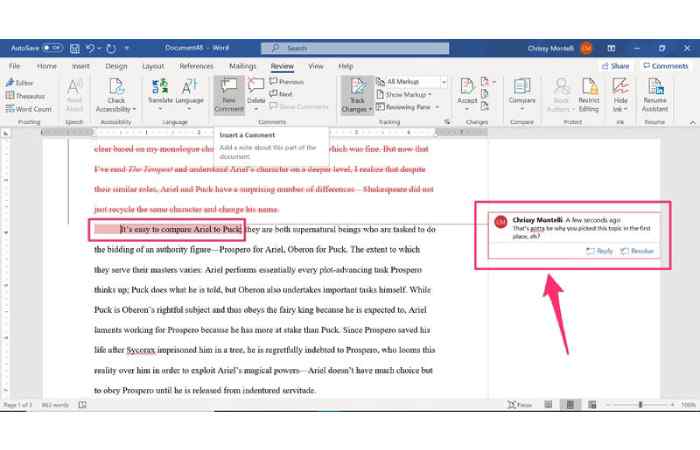
- Make edits — insertions show as underlined text, deletions as strike-through or ballooned notes, and format changes are listed in the Reviewing pane.
- Add comments for context (Review → New Comment).
- Accept or reject changes one by one or in bulk (Review → Accept/Reject).
- When finished, save a clean copy (Accept All) and keep a marked copy for your audit trail if needed.
How tracked edits appear (visuals explained)
- Insertions: new text usually underlined or shown in a color assigned to the reviewer.
- Deletions: struck-through text, often shown as a balloon or inline deletion.
- Formatting changes: noted in balloons or the Reviewing Pane.
- Comments: shown as callouts in the margin, linked to the relevant text.
- Show Markup: a dropdown lets you toggle which markup types (comments, insertions/deletions, formatting) and which reviewers are shown.
A practical workflow — collaborative editing from start to finish
- Before you share — Turn on Track Changes and add a brief note in the document header: “Please keep Track Changes on and add initials to your display name.”
- Set reviewer names — Word uses the user profile name. Encourage contributors to set their display name in Word so changes show a useful name.
- Edit and comment — Make edits; use comments for explanations. Reply to comments rather than creating new ones when following a thread.
- Review stage — The document owner (or a designated reviewer) goes through changes: accepts, rejects, or edits further.
- Clean up — After final acceptance, save a clean copy (Accept All). Keep a separate file with all accepted/rejected history if you need an audit record.
- Publish — Share the finalized, accepted version for distribution.
Accepting/rejecting changes — step-by-step
- Go to Review > Changes group.
- Use Previous / Next to jump through changes.
- Click Accept or Reject for each one; you can accept/reject all at once using the dropdown menu.
If you need to change the author’s tracked edit (e.g., to tweak a sentence), edit while Track Changes is on so the next change is recorded as a new tracked change (or turn Track Changes off to make silent edits).
Track Changes settings you should know
- Show Markup: choose which reviewers and types of changes appear.
- Balloons vs Inline: display deletions and formatting in balloons (margin) or inline.
- Use Balloons for…: choose to show only comments and formatting in balloons.
- Change User Name and Initials: File > Options > General > Personalize your copy.
- Highlight Color: Word auto-assigns colors by reviewer; you can’t set color per person directly in standard Word.
Keyboard shortcuts
| Action | Windows shortcut | Mac shortcut |
| Toggle Track Changes | Ctrl+Shift+E | Cmd+Shift+E |
| Next change | Alt+Shift+N (or use ribbon) | Option+Cmd+G (varies) |
| Accept change | Alt+A then A (ribbon sequence) | Use ribbon or context menu |
| Reject change | Alt+A then R (ribbon sequence) | Use ribbon or context menu |
| Insert comment | Ctrl+Alt+M | Cmd+Option+A |
| Move to next comment | Ctrl+Alt+N | Cmd+Option+N |
Note: some shortcuts differ by Word version; if a shortcut fails, use the ribbon commands under Review.
Compare vs Combine — what’s the difference?
- Compare: Three inputs undergo conversion to document catching differences. The best thing is when two persons edited two different copies and you want to see them in one view.
- Combine: takes the revisions of various reviewers in a document and uses Track Changes to consolidate all the changes. Combine Use Combine when each reviewer made his/her copy and you need to remember what changes have been made by each reviewer.
Both are under Review > Compare. Choose Combine if you want to preserve reviewer names, or Compare for a one-off diff.
Real-world examples
- Academic peer review: authors and referees exchange edits; editor uses Accept/Reject to finalize.
- Legal contracts: maintain an auditable trail of every change and comment.
- Marketing copy: multiple stakeholders suggest wording; team lead curates final text.
- Policy documents: version control with commentary for governance review.
Troubleshooting table — when Track Changes acts weird
| Problem | Likely cause | Quick fix |
| Edits don’t show as tracked | Track Changes is off | Turn on Track Changes (Review > Track Changes) |
| All changes show as by the same person | Document user name not set or combined documents used | Set correct user name in File > Options > General; use Combine properly |
| Tracked changes disappear after saving | Someone accepted all changes or saved a clean copy | Check for earlier versions or ask collaborators |
| Comments/changes hidden | View is set to Simple Markup or markup types hidden | Review > Show Markup > ensure items checked; switch to All Markup |
| Formatting changes not showing | Formatting markup disabled | Show Markup > Formatting |
| Cannot accept/reject | Document protected or restricted editing enabled | Review > Restrict Editing; disable or get permission |
Best practices & etiquette
- Ask collaborators to turn on Track Changes before editing.
- Add a short note in the document’s header/footer telling people to keep Track Changes on.
- Use comments to explain why a change was made, not just what.
- Avoid accepting all changes blindly — skim the document first.
- When finalizing, save a clean “Published” PDF and an “Archive” copy with all tracked changes retained if needed for records.
- If you need silent edits (e.g., fixing typos before review), either: (a) turn Track Changes off and make edits, or (b) make edits in a copy and explain why.
How to print with/without markup
- To print the document with markup: File > Print > under Settings choose Print Markup (checkbox).
- To print clean text: uncheck Print Markup or switch view to No Markup, then print.
Security & permissions
- Track Changes is not an access control tool. If you must prevent edits:
- Restrict Editing (Review > Restrict Editing) is used to control the people that are allowed to make changes.
- Password the sensitive documents (File >Info > Protect Document).
Note: Content and metadata Tracked changes are not saved in the content or metadata of the document until they have been given the go-ahead-saving button – in case of confidentiality issues, remove metadata and compare final copies before sharing.
FAQ
Q: In case I accept everything which changes, is it possible to recover initial value?
A: Not like that file, Removing markup into the text of the document is what is called accepting. Retain an access copy or go to Version History (OneDrive/SharePoint) so as to retrieve previous versions.
Q: What should I do to change tracked edits to change the name of a reviewer?
A: Word retains the name upon the time when the change was done. Subsequent edits can be renamed (File > Options > General > Username) however, pending edits retain the original name, but the changes they made are recorded in the tracked changes. It would require third party tools or deletion and re-creation of edits to reassign previous changes.
Q: Can I filter markup to one reviewer?
A: Yes — Review > Show Markup > Specific People, then pick a reviewer.
Final Words
Track Changes in Microsoft Word is not merely an editing tool, but it is an effective collaboration tool that puts transparency, responsibility, and organization in the document review process. Be it a business proposal, academic paper, a legal agreement or even a marketing document, Track Changes makes all edits clear so that they may be tracked, traced and can be analyzed easily.
Also Read: https://www.worldwidewebblog.com